Installing and Configuring OpenVPN Server on Windows
This step-by-step guide will help you install and configure an OpenVPN server on Windows.
This step-by-step guide will help you install and configure an OpenVPN server on Windows. If you need a secure and private VPN solution, setting up an OpenVPN server is one of the best choices for remote access and encrypted connections.
1. Installing OpenVPN Server
- Download OpenVPN Community Edition from the official site:
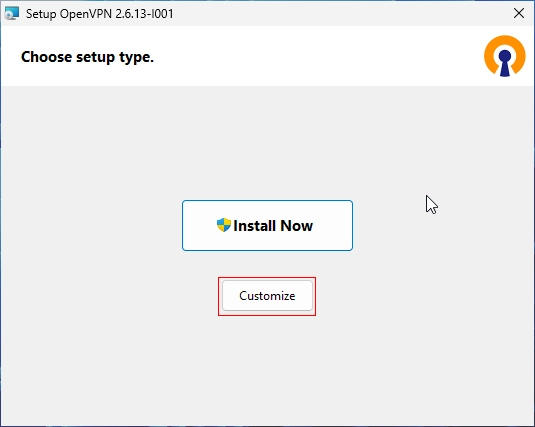
https://openvpn.net/community-downloads/ - Don’t click Install Now. Click Customize instead:
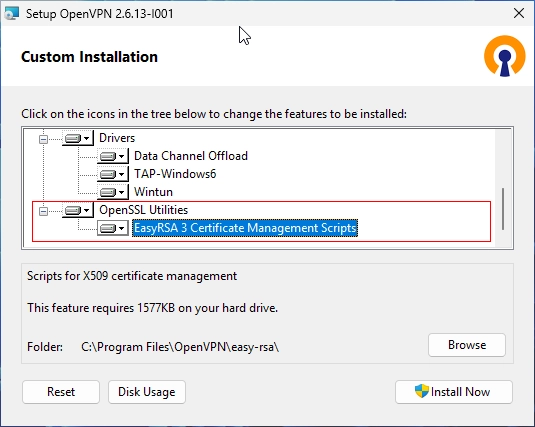
- Select the EasyRSA 3 Certificate Management Scripts component to install it together with OpenVPN:
- Complete the installation.
- After installing OpenVPN, do not start it yet.
2. Configuring EasyRSA for OpenVPN Server
EasyRSA is used to create certificates and keys for the OpenVPN server.
If you installed EasyRSA using the OpenVPN installer, you can find it in:
C:\Program Files\OpenVPN\easy-rsa
Open Command Prompt as Administrator and navigate to this folder:
cd "C:\Program Files\OpenVPN\easy-rsa"If you did not install EasyRSA during OpenVPN installation, download the latest version manually:
https://github.com/OpenVPN/easy-rsa/releases
Extract the archive to C:\Program Files\OpenVPN\easy-rsa and continue with the setup.
3. Generating Certificates and Keys for OpenVPN Server
Initialize the PKI (Public Key Infrastructure)
EasyRSA-Start.bat
./easyrsa init-pki
Create the Root Certificate (CA) for OpenVPN Server
- If you want to set a password (it must be entered for each certificate signing):
./easyrsa build-ca - If you want OpenVPN to start automatically, it’s better not to use a password:
./easyrsa build-ca nopass
Create the OpenVPN Server Certificate and Key
./easyrsa build-server-full server nopassGenerate a Diffie-Hellman Key for Secure OpenVPN Server Encryption
./easyrsa gen-dhCreate a Client Certificate for OpenVPN Server Clients (repeat for each client)
./easyrsa build-client-full client1 nopassExit EasyRSA Shell
Before proceeding, exit the EasyRSA shell by running:
exit4. Copying Certificates to OpenVPN Server
After creating the certificates, copy them to **C:\Program Files\OpenVPN\config-auto**:
copy "C:\Program Files\OpenVPN\easy-rsa\pki\ca.crt" "C:\Program Files\OpenVPN\config-auto\"
copy "C:\Program Files\OpenVPN\easy-rsa\pki\issued\server.crt" "C:\Program Files\OpenVPN\config-auto\"
copy "C:\Program Files\OpenVPN\easy-rsa\pki\private\server.key" "C:\Program Files\OpenVPN\config-auto\"
copy "C:\Program Files\OpenVPN\easy-rsa\pki\dh.pem" "C:\Program Files\OpenVPN\config-auto\"
5. Configuring the OpenVPN Server on Windows
- Copy the sample configuration file:
copy "C:\Program Files\OpenVPN\sample-config\server.ovpn" "C:\Program Files\OpenVPN\config-auto\" - Open C:\Program Files\OpenVPN\config-auto\server.ovpn in a text editor (e.g., Notepad++).
- Replace certificate paths (double backslashes
\\are required for Windows):ca "C:\\Program Files\\OpenVPN\\config-auto\\ca.crt"cert "C:\\Program Files\\OpenVPN\\config-auto\\server.crt"key "C:\\Program Files\\OpenVPN\\config-auto\\server.key"dh "C:\\Program Files\\OpenVPN\\config-auto\\dh.pem" - Configure the network parameters for OpenVPN Server:
proto udp4
server 10.8.0.0 255.255.255.0
push "redirect-gateway def1 bypass-dhcp"
push "dhcp-option DNS 8.8.8.8"
6. Restarting OpenVPN Service to Apply Changes
After making changes to the OpenVPN configuration, you need to restart the OpenVPN service to apply them.
Run the following commands in Command Prompt (cmd) as Administrator:
net stop OpenVPNService
net start OpenVPNService
7. Allow OpenVPN Through Windows Firewall
By default, the OpenVPN installer does not automatically add firewall exceptions for incoming connections. To allow OpenVPN traffic, follow these steps:
- Open Command Prompt (cmd) as Administrator.
- Run the following command to allow inbound connections to OpenVPN:
netsh advfirewall firewall add rule name="OpenVPN Server" dir=in action=allow program="C:\Program Files\OpenVPN\bin\openvpn.exe" enable=yes
This ensures that the OpenVPN server can accept incoming VPN connections.
✅ Your OpenVPN Server is now fully configured!
8. Creating a Client OVPN File with Embedded Keys and Connecting via Android
To connect to your OpenVPN server from an Android device, create a single .ovpn file that includes all necessary keys and certificates.
Create the Client OVPN File
- Open a text editor and create a new file named
client.ovpn. - Copy and paste the following configuration, replacing
YOUR_SERVER_IPwith your actual server’s public IP:clientdev tunproto udp4remote YOUR_SERVER_IP 1194resolv-retry infinitenobindpersist-keypersist-tunremote-cert-tls server<ca>-----BEGIN CERTIFICATE-----(Paste the contents of ca.crt here)-----END CERTIFICATE-----</ca><cert>-----BEGIN CERTIFICATE-----(Paste the contents of client1.crt here)-----END CERTIFICATE-----</cert><key>-----BEGIN PRIVATE KEY-----(Paste the contents of client1.key here)-----END PRIVATE KEY-----</key> - Save the file as
client.ovpn.
Transfer the OVPN File to Your Android Device
- Copy the
client.ovpnfile to your Android device using:- USB cable
- Google Drive
Install OpenVPN Connect on Android
- Open Google Play Store.
- Search for OpenVPN Connect and install it.
- Open the app and tap OVPN Profile.
- Import the
client.ovpnfile from your device. - Tap Connect to establish the VPN connection.
Your Android device should now be connected to your OpenVPN server!
By following this guide, you’ve successfully set up an OpenVPN server on Windows, ensuring secure and encrypted remote access. Let us know if you need further assistance!
Comment on this post